11-27 1,867 views
该架构是一整套基于 nodejs 全栈的开发,简单、高效
安装
安装环境以Windows操作系统为例
Nodejs安装
-
在Nodejs官网下载 TLS 版本
-
选择
Windows Binary (.zip) 64位下载

-
解压到安装目录,如:
D:\Program_Files\nodejs -
配置环境变量 将
D:\Program_Files\nodejs添加到path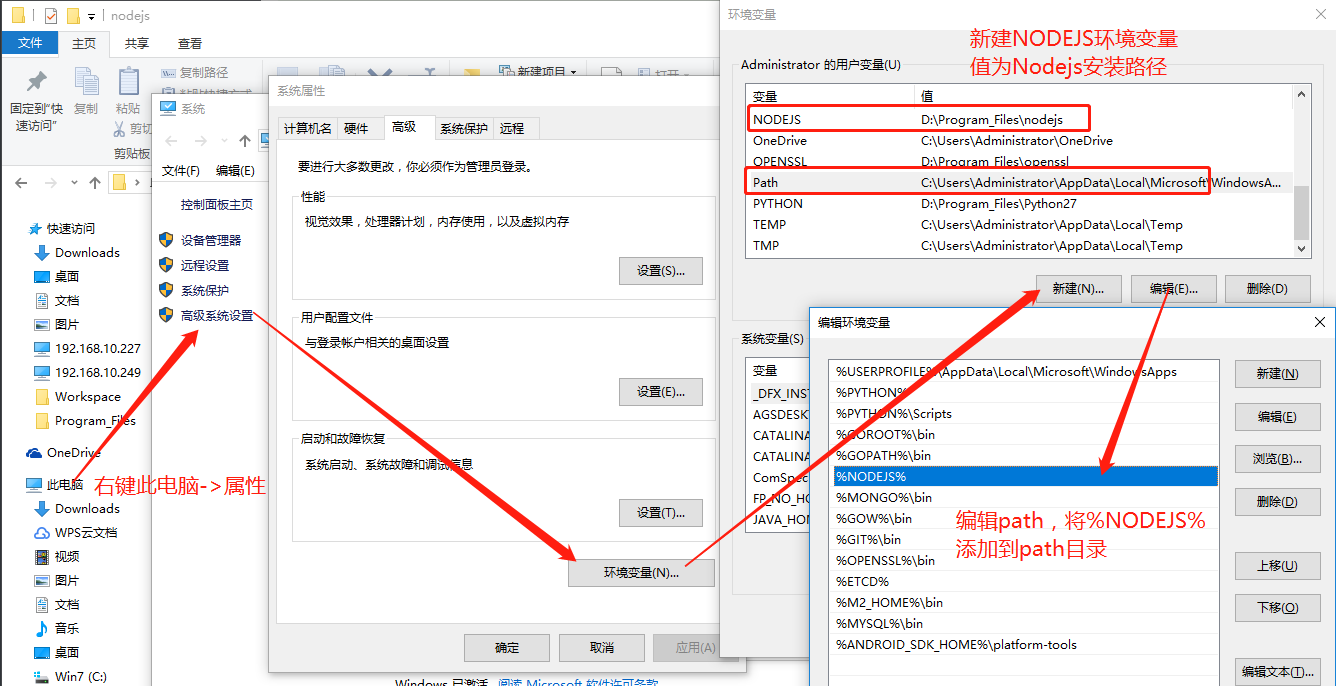
-
node --version来测试是否安装配置成功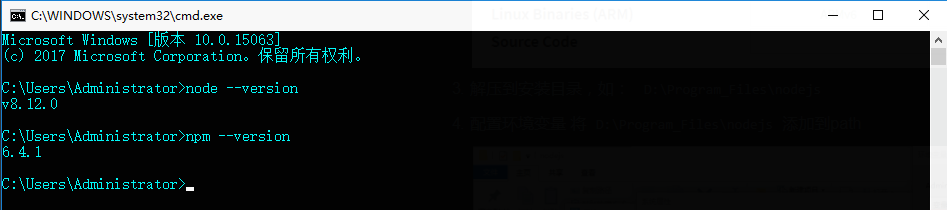
-
配置npm
npm 全称 node package manager,类似于 java 的 maven 或 python 的 pip
npm config set prefix "D:\Program_Files\nodejs" npm config set cache "D:\Program_Files\nodejs\npm_cache" npm config set registry "https://registry.npm.taobao.org" -
使用npm安装一个包测试, -g 表示全局安装
npm install bower -g
完成后查看安装目录下
npm_cache和node_modules目录里是否多了个bower -
hello world
创建hello.js
console.log("hello world")然后在命令行执行
node hello.js运行至此,nodejs就安装配置完毕。
Mongodb安装
-
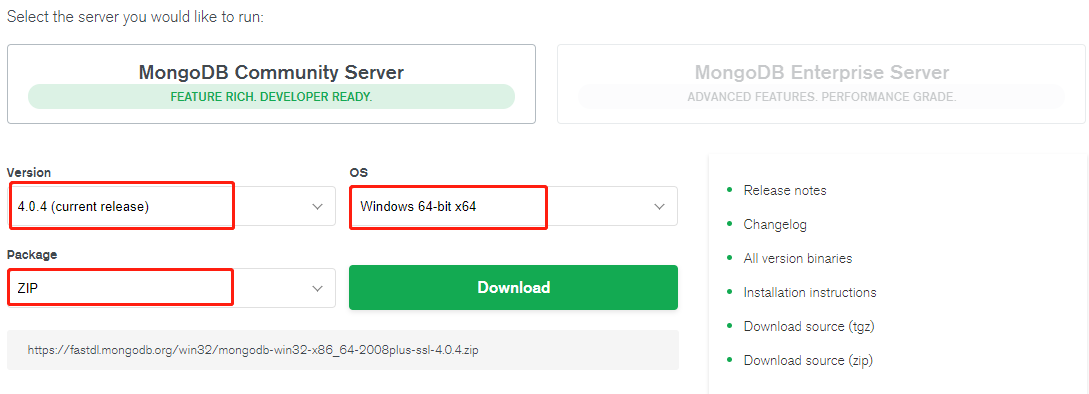
在Mongodb官网,选择 MongoDB Community Server 版本下载
-
解压到
D:\Program_Files\MongoDB -
配置环境变量 将
D:\Program_Files\MongoDB添加到path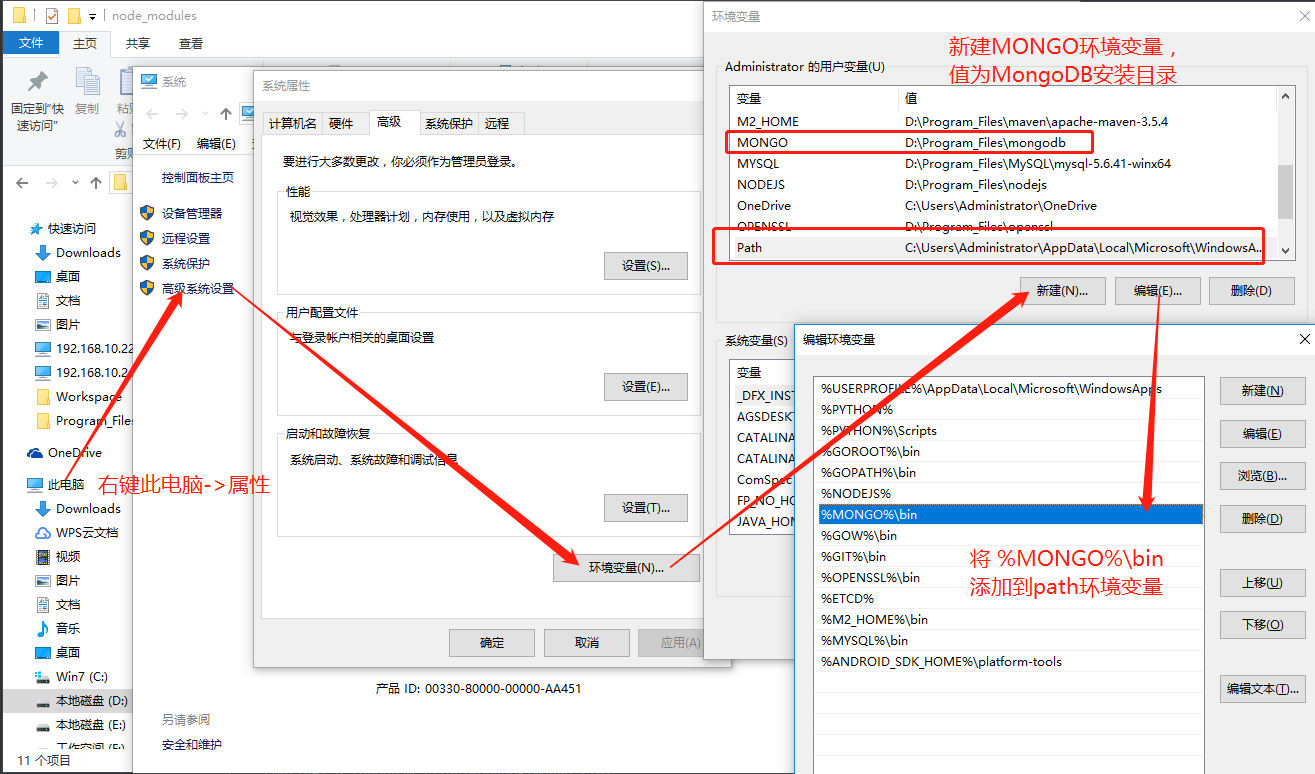
-
创建目录
D:\program_files\MongoDB\data\db用于存放数据库 -
创建目录
D:\program_files\MongoDB\data\log用于存放日志 - 创建并编辑配置文件
D:\program_files\MongoDB\mongo.cfg
dbpath=D:\program_files\MongoDB\data\db
logpath=D:\program_files\MongoDB\data\log\mongo.log- 将MongoDB安装为服务
以管理员权限运行命令行窗口,执行下面的命令创建MongoDB服务
sc create MongoDB binPath= "\"D:\program_files\MongoDB\bin\mongod.exe\" --service --config=\"D:\program_files\MongoDB\mongo.cfg\""- 启动服务
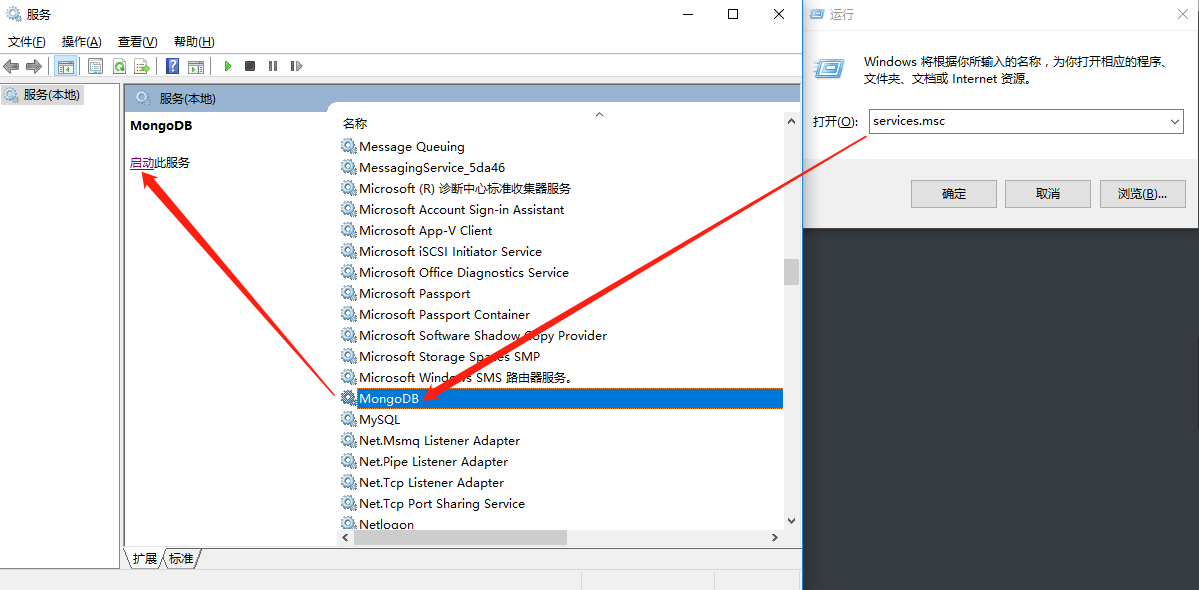
命令行启动
net start mongodb或者在 windows服务里启动 Win+R -> services.msc -> MongoDB -> 启动
-
测试使用
mongo
use test;
db.name.insert([{"name":"xiu", "gender":"male"},{"name":"jing", "gender":"male"}]);
db.name.find({});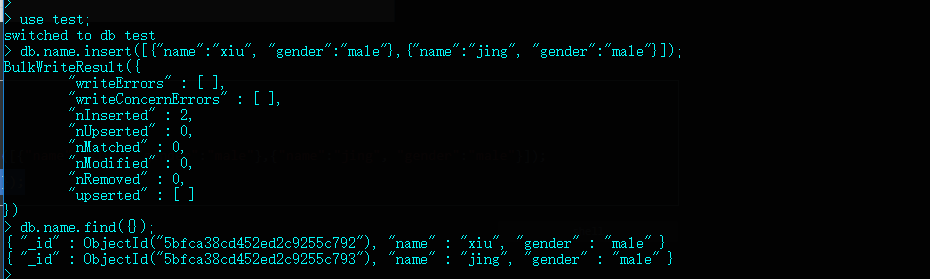
至此MongoDB就安装配置完成了
安装 ParseServer
Parse Server 是基于 nodejs 开发的,安装命令:
npm install -g parse-serverParse Server 使用MongoDB数据库,运行前确保MongoDB服务已启动。运行命令:
parse-server --appId APPLICATION_ID --masterKey MASTER_KEY --databaseURI mongodb://localhost/test安装 ParseDarshboard
Parse Darshboard 是基于 nodejs 开发的,安装命令:
npm install -g parse-dashboard运行,确保 parse-dashboard 的 appId、masterKey 与 parse-server 运行时的 appId、masterKey 一致:
parse-dashboard --appId yourAppId --masterKey yourMasterKey --serverURL "http://localhost:1337/parse" --allowInsecureHTTP false --appName optionalName 或者通过配置文件运行,配置文件如下:
{
    "apps": [
      {
        "appId": "nkygq",
        "masterKey": "b1a51ba6398c594caeb66e24",
        "readOnlyMasterKey": "608db4df7459516138be09e",
        "serverURL": "http://nkygq.app.nxztsckj.com:8081/parse",
        "production": false,
        "allowInsecureHTTP": false
      },
      {
        "appId": "nkygq-local",
        "masterKey": "b1a51ba6398c59cfb66e24",
        "readOnlyMasterKey": "608db4df745613a198be09e",
        "serverURL": "http://192.168.10.88:1337/parse",
        "port": 4041,
        "production": false,
        "allowInsecureHTTP": false
      },
      {
        "appId": "fuxi-local",
        "masterKey": "d2381588f5084a305d815916",
        "readOnlyMasterKey": "608db4df745198be09e",
        "serverURL": "http://192.168.10.88:1337/parse",
        "port": 4041,
        "production": false,
        "allowInsecureHTTP": false
      }
    ],
    "users": [
      {
        "user":"admin",
        "pass":"123456",
        "readOnly": false,
        "apps": [{"appId": "nkygq"},{"appId": "nkygq-local"},{"appId": "fuxi-local"}]
      },
      {
        "user":"fuxi",
        "pass":"123456",
        "readOnly": false,
        "apps": [{"appId": "fuxi-local"}]
      }
    ]
}
运行命令:
parse-dashboard --config parse-dashboard-config.json --allowInsecureHTTP false安装 Vue
使用 npm 安装 vue
npm install -g @vue/cli创建 hello world
vue create hello启动项目
npm run serve使用浏览器打开 http://localhost:8080访问预览;
一般启动后,修改代码无需再启动,vue 会自动刷新浏览器;
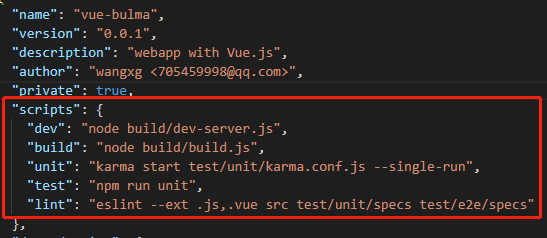
不同的项目,启动命令稍有不同,具体可在项目的package.json文件中查看,下面配置的启动命令则为 npm run dev
开发
Parse API
基本的增、查、改、删
| URL | HTTP Verb | Functionality |
|---|---|---|
/parse/classes/<className> |
POST | Creating Objects |
/parse/classes/<className>/<objectId> |
GET | Retrieving Objects |
/parse/classes/<className>/<objectId> |
PUT | Updating Objects |
/parse/classes/<className> |
GET | Queries |
/parse/classes/<className>/<objectId> |
DELETE | Deleting Objects |
Cloud Code
const SMSClient = require('@alicloud/sms-sdk')
const accessKeyId = 'LTAIb74gnW'
const secretAccessKey = 'B3x4L110bSkgWQPeDAbD8'
let smsClient = new SMSClient({accessKeyId, secretAccessKey})

function sendVerifyCode(phone, code){
    let params = {code:code}
    console.log(JSON.stringify(params))

    //发送短信
    smsClient.sendSMS({
        PhoneNumbers: phone,    //必填:待发送手机号。支持以逗号分隔的形式进行批量调用,批量上限为1000个手机号码,批量调用相对于单条调用及时性稍有延迟,验证码类型的短信推荐使用单条调用的方式;发送国际/港澳台消息时,接收号码格式为:国际区号+号码,如“85200000000”
        SignName: '宁夏农业生物灾害监测预警',         // 必填:短信签名-可在短信控制台中找到
        TemplateCode: 'SMS_150865964',    // 必填:短信模板-可在短信控制台中找到,发送国际/港澳台消息时,请使用国际/港澳台短信模版
        TemplateParam: JSON.stringify(params)  //可选:模板中的变量替换JSON串,如模板内容为"亲爱的${name},您的验证码为${code}"时。
    }).then(function (res) {
        let {Code}=res
        if (Code === 'OK') {
            //处理返回参数
            console.log(res)
        }
    }, function (err) {
        console.log(err)
    })
}

function randomCode(n){
    let chars = ['0','1','2','3','4','5','6','7','8','9'];
    let res = "";
    for(var i = 0; i < n ; i ++) {
        var id = Math.ceil(Math.random()*(chars.length)-1);
        res += chars[id];
    }
    return res;
}

Parse.Cloud.beforeSave("Verification", (request) => {
    let type = request.object.get('type')
    let status = request.object.get('status')
    if('active' == status){
        if('phone' == type){
            let code = randomCode(6);
            request.object.set('code', code);
            sendVerifyCode(request.object.get('phone'), code)
        }
        request.object.set('status', 'produce')    // active, produce, consume
    }
});

Parse.Cloud.define("resetpwd", async (req, res) => {
    let category = req.params.category;
    let type = req.params.type;
    let phone = req.params.phone;
    let code = req.params.code;
    let password = req.params.password;
    let myresult = '';

    let query = new Parse.Query('Verification');
    query.equalTo('category', category);
    query.equalTo('type', type);
    query.equalTo('phone', phone);
    query.equalTo('code', code);
    query.equalTo('status', 'produce');
    await query.first()
    .then(async (codeRet)=>{
        if(codeRet){
            myresult = await resetpwd2(phone, password, res, codeRet)
        }else{
            myresult = 'Invalid verify code';
        }
    }, (error)=>{
        myresult = '' + error;
    })
    console.log(myresult)
    return myresult;
});

async function resetpwd2(username, password, response, codeRet){
    let myresult = ''
    let query = new Parse.Query(Parse.User);
    query.equalTo('username', username);
    await query.first().then(async (result)=>{
        if(result){
            result.setPassword(password);
            await result.save(null,{useMasterKey:true})
            .then((result)=>{
                codeRet.set('status', 'consume')
                codeRet.save()
                myresult = 'OK';
            }, (error)=>{
                myresult = ''+ error;
            });
        }else{
            myresult = 'User not found';
        }

    }, (error)=>{
        myresult = '' + error;
    })
    return myresult;
}
Vue
前端开发框架有:
Vue 国内一个人开发,也就国内的人用的比较多,文档是中文的
React / Ract Native Facebook开发的
Angular
基本安装套路 名字-cli command-line interface
glup 负责打包压缩实时监测文件的变化
安装
npm install -g @vue/cli
vue create my-project
npm run dev
nodejs项目启动常见命令
node start
node run dev
node run serve
项目中引入第三方库
在你的项目文件夹下执行命令
npm install parse --save路由
重点
https://www.runoob.com/vue2/vue-routing.html
开源项目
https://segmentfault.com/p/1210000008583242/read?from=timeline
https://github.com/wangxg2016/vue-bulma
https://github.com/lzxb/vue-cnode
http://element-cn.eleme.io/#/en-US/component/checkbox
部署
nginx部署
    server {
        listen       80;
        server_name localhost;

        location / {
            root usr/local/vue/page;
            try_files $uri $uri/ @router;
            index index.html;
        }
    location = /index.html {
        add_header Cache-Control "no-cache, no-store";
    }
        error_page 500 502 503 504 /50x.html;
            location = /50x.html {
            root html;
        }
        location @router {
            rewrite ^.*$ /index.html last;
        }
    }