8-04 1,517 views
Configure Linux IP Address
CentOS
Configure eth0
vi /etc/sysconfig/network-scripts/ifcfg-eth0DEVICE="eth0"
NM_CONTROLLED="yes"
ONBOOT=yes
HWADDR=A4:BA:DB:37:F1:04
TYPE=Ethernet
BOOTPROTO=static
NAME="System eth0"
UUID=5fb06bd0-0bb0-7ffb-45f1-d6edd65f3e03
IPADDR=192.168.0.44
NETMASK=255.255.255.0Configure Default Gateway
vi /etc/sysconfig/networkNETWORKING=yes
HOSTNAME=centos6
GATEWAY=192.168.0.1Restart Network Interface
/etc/init.d/network restartConfigure DNS Server
vi /etc/resolv.confnameserver 8.8.8.8
nameserver 114.114.114.114VirtualBox Copy Image
复制虚拟机镜像后网卡显示 eth1
正常来说,Linux在识别网卡时第一张会是eth0,第二张才是eth1。有时候我们使用虚拟机克隆技术后网卡的信息就会改变,新克隆出来的虚拟主机网卡名字可能变为eth1.无论我们怎么修改都无法改变,这就对我们使用N台虚拟机进行HA-heartbeat实验时造成了困扰。
在这里成这样是因为复制系统的过程中复制的文件已经有一个网卡在/etc/udev/rules.d/70-persistent-net.rules被识别成了eth0,而虚拟机中的识别成了eth1。
解决方法:
编辑/etc/udev/rules.d/70-persistent-net.rules, 找到与 ifconfig -a 得出的MAC相同的一行NAME='eth1'这一行,把它改为 NAME=eth0,然后把上面一行NAME='eth0' 删除掉。
vim /etc/udev/rules.d/70-persistent-net.rulesSUBSYSTEM=="net", ACTION=="add", DRIVERS=="?*", ATTR{address}=="00:0c:29:bb:41:2b", ATTR{type}=="1", KERNEL=="eth*", NAME="eth0"编辑/etc/sysconfig/network-script/ifcfg-eth0, 把MAC改为正确的,把UUID删掉。
如有必要,编辑/etc/sysconf/network,把 hostname 也改一下。
rebootUbuntu
Config enp0s3
sudo vi /etc/network/interfaces# The primary network interface
auto enp0s3
iface enp0s3 inet static
address 172.16.4.166
netmask 255.255.255.0
gateway 172.16.4.254
dns-nameservers 8.8.8.8 114.114.114.114Shutdown your Virtual Machine and then!!! Go to network settings and click on refresh MAC address button a few times 🙂
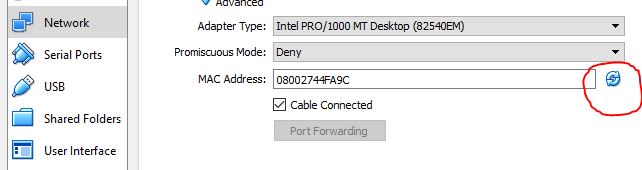
and start your VM and you should get internet!
OpenSSH Server
sudo vi /etc/ssh/sshd_config找到 PermitRootLogin ,将其设置为 yes
#PermitRootLogin prohibit-password
PermitRootLogin yes
重启 SSH Server
sudo service sshd restart